

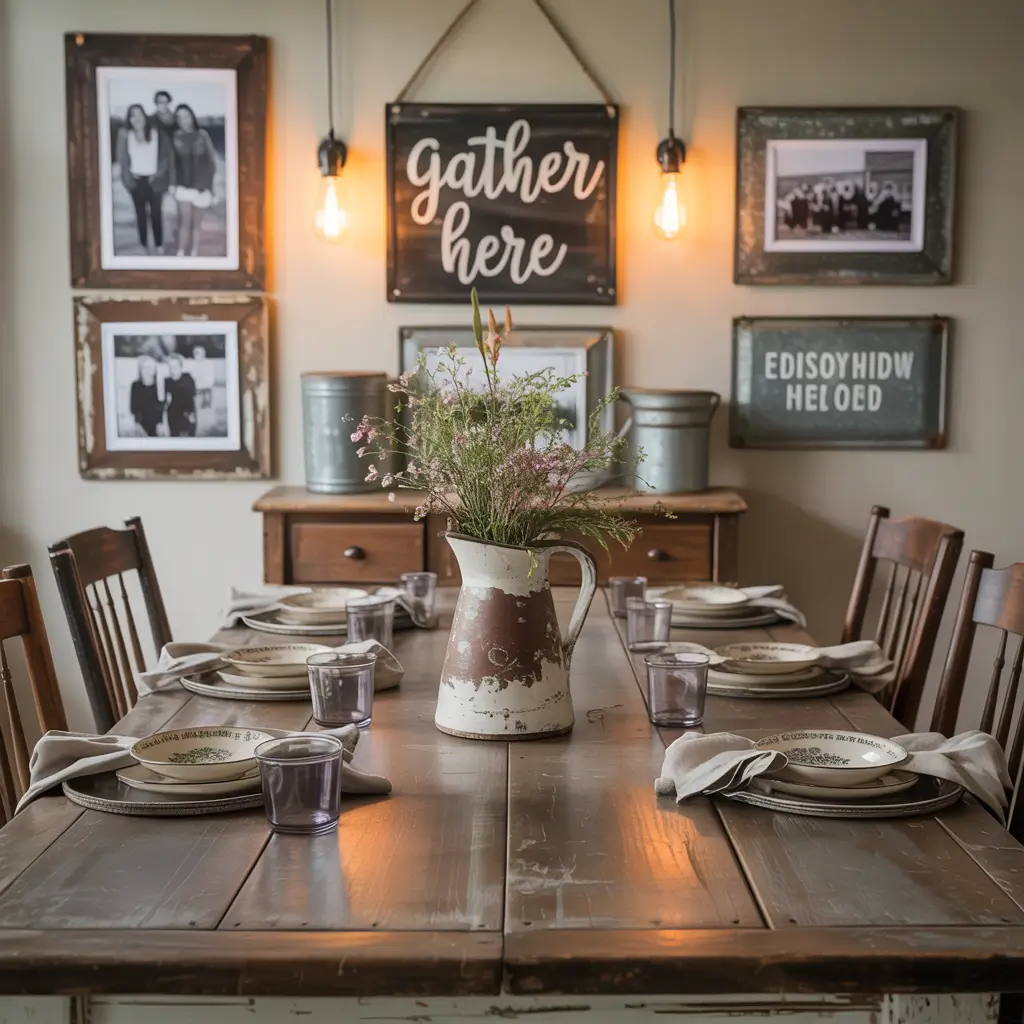
15 Beautiful DIY Bedroom Decor Tips for Stylish Spaces
Look, I get it. You’re staring at your bedroom walls thinking they’re about as exciting as watching paint dry (pun intended). You want something fresh, something that screams you, but your wallet is giving you the silent treatment every time you browse Pinterest. Been there, scrolled through that.
Here’s the thing: transforming your bedroom doesn’t require a small fortune or a degree in interior design. I’ve tried pretty much every DIY trick in the book, made my fair share of crafting disasters (trust me, there were moments), and finally figured out what actually works. These 15 DIY bedroom decor ideas won’t just save you money—they’ll give your space personality that those mass-produced HomeGoods items never could.
Macrame Headboard Wall Art
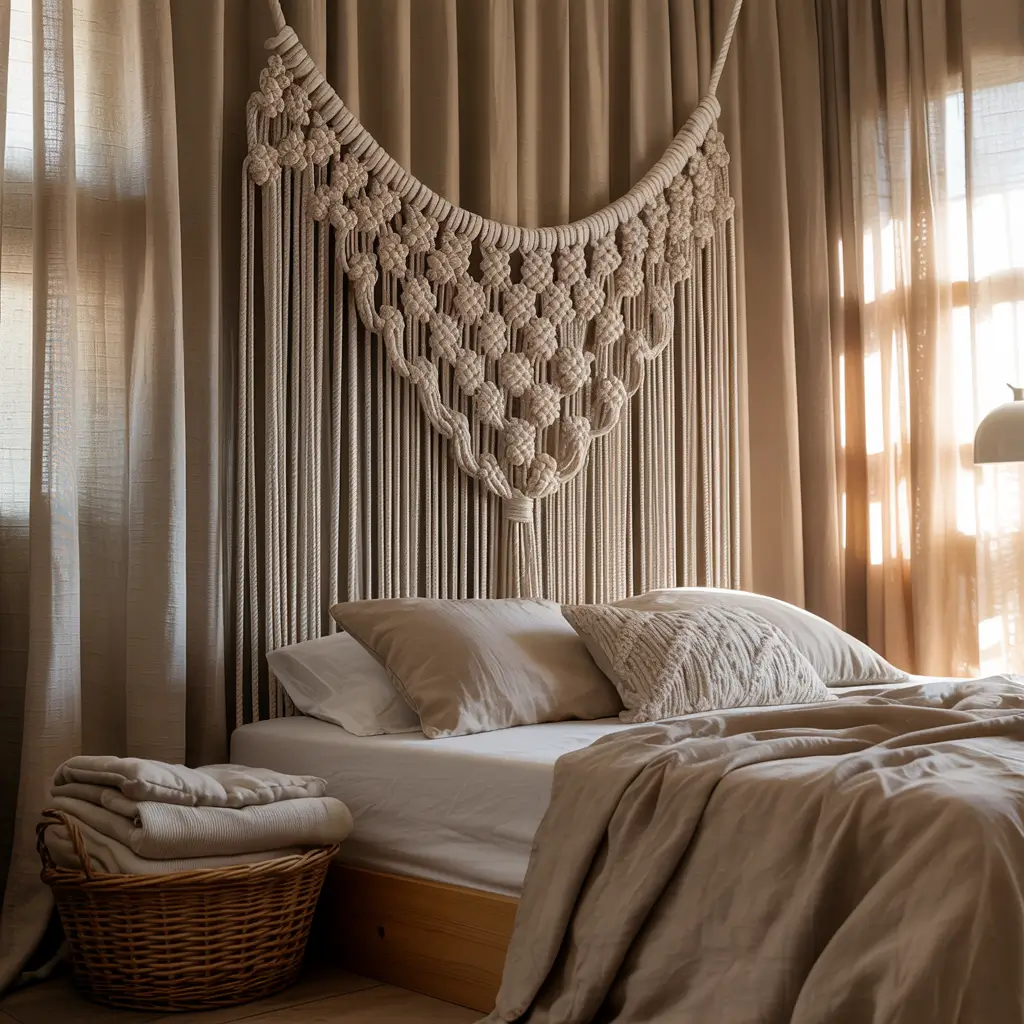
Ever noticed how macrame suddenly became the poster child for boho-chic design? There’s actually a good reason for that. Creating a macrame headboard is probably one of the most dramatic visual impacts you can achieve with just some rope and patience.
I started my first macrame project thinking I’d finish in an afternoon. Spoiler alert: I didn’t. But once you get the basic knots down (square knots and half-hitch knots are your best friends), this project becomes oddly therapeutic. You’ll need:
- Macrame cord (3-5mm thickness works best)
- A wooden dowel or copper pipe for hanging
- Scissors
- A measuring tape
- About 6-8 hours of Netflix binge-watching time
The beauty of a macrame headboard is that you don’t need an actual headboard frame. Just hang your creation above your bed, and boom—instant focal point. Plus, the texture adds warmth to your space in a way that flat wall art just can’t compete with.
Pro tip: Start with a smaller design before committing to a king-size masterpiece. I learned this the hard way when I had to undo about three hours of work because I miscalculated my cord length. Not fun. :/
Painted Gradient Nightstand
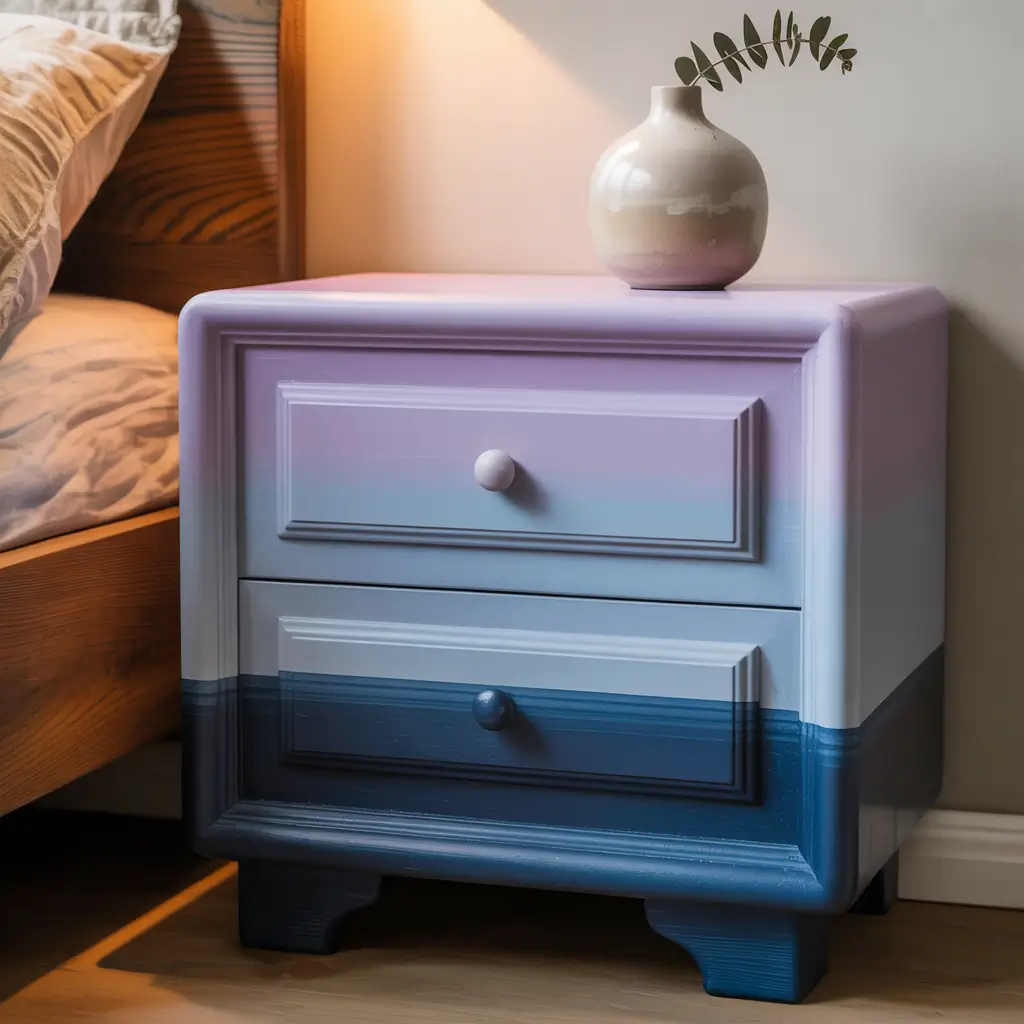
Your basic IKEA nightstand is functional, sure, but personality? Zero. A gradient paint job changes that completely, and you don’t need to be Picasso to pull it off.
I grabbed an old nightstand from a thrift store for like $15, and honestly, that weathered look actually worked in my favor. Here’s what makes this project foolproof:
Materials you’ll need:
- Sandpaper (medium grit)
- Primer
- 2-3 paint colors in the same family
- Foam brushes or regular paintbrushes
- Clear sealer
The gradient technique is simpler than it looks. You paint the darkest color at the bottom, the lightest at the top, and blend where they meet using a dry brush technique. The key is working while the paint is still wet, so don’t paint the whole thing and then try to blend. Work in sections.
What I love about this project is that every single one turns out unique. Mine went from deep navy to soft sky blue, and it somehow ties together all the random blue accents I’ve accumulated over the years.
DIY Fabric Scrap Lampshade
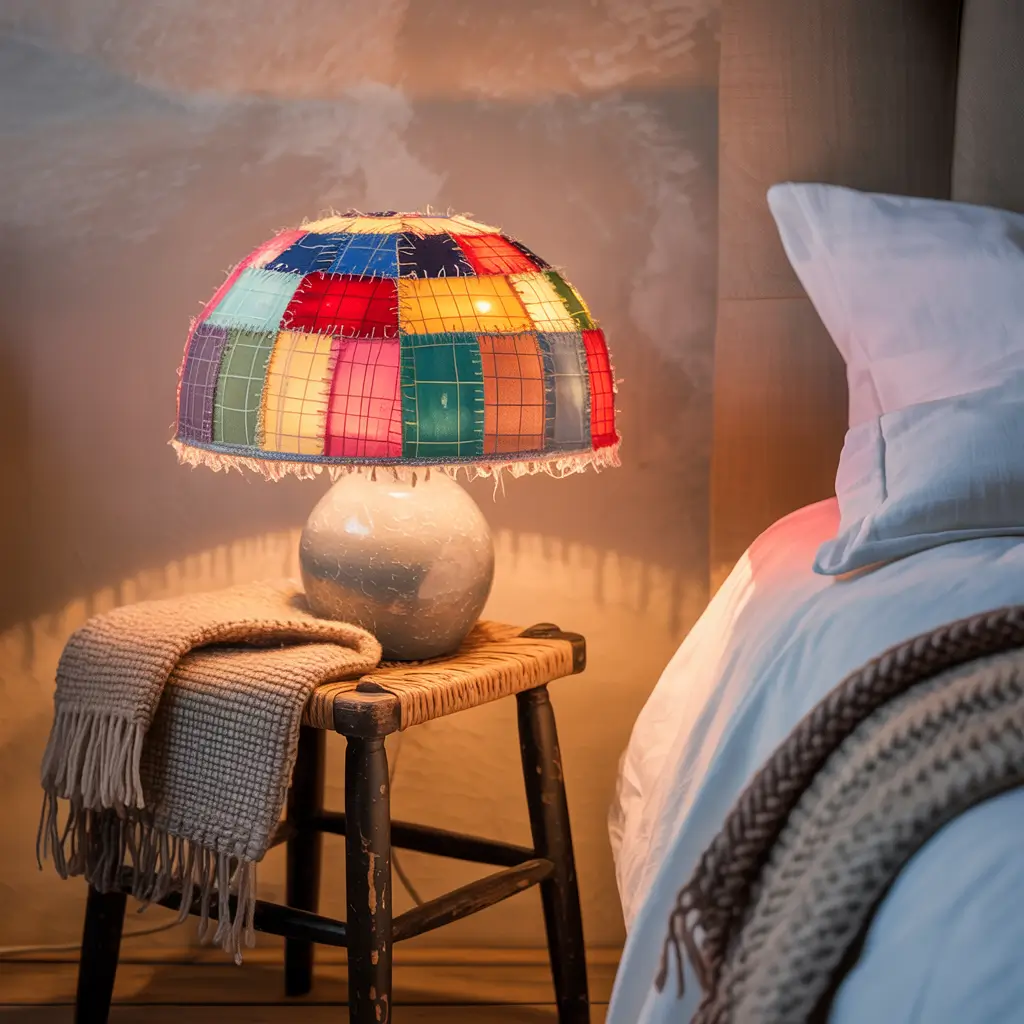
Those plain lampshades that come with basically every lamp? Boring central. But here’s where your fabric scraps become the MVP of bedroom decor.
I’d been hoarding fabric scraps for years (don’t judge me), and this project finally gave them purpose. You can use:
- Old t-shirts you can’t bear to throw away
- Leftover fabric from other projects
- Vintage scarves from thrift stores
- Even old bedsheets with cool patterns
The process is straightforward. You’ll use fabric decoupage medium (Mod Podge works great) to attach fabric pieces to a plain lampshade in whatever pattern speaks to you. Overlapping pieces create interesting dimension. Random patchwork? Cool. Organized stripes? Also cool. There’s literally no wrong answer here.
IMO, this is the perfect weekend afternoon project when you want to feel productive but don’t want to think too hard. The result looks way more expensive than the $8 in supplies it actually cost me.
Rustic Wood Pallet Floating Shelf
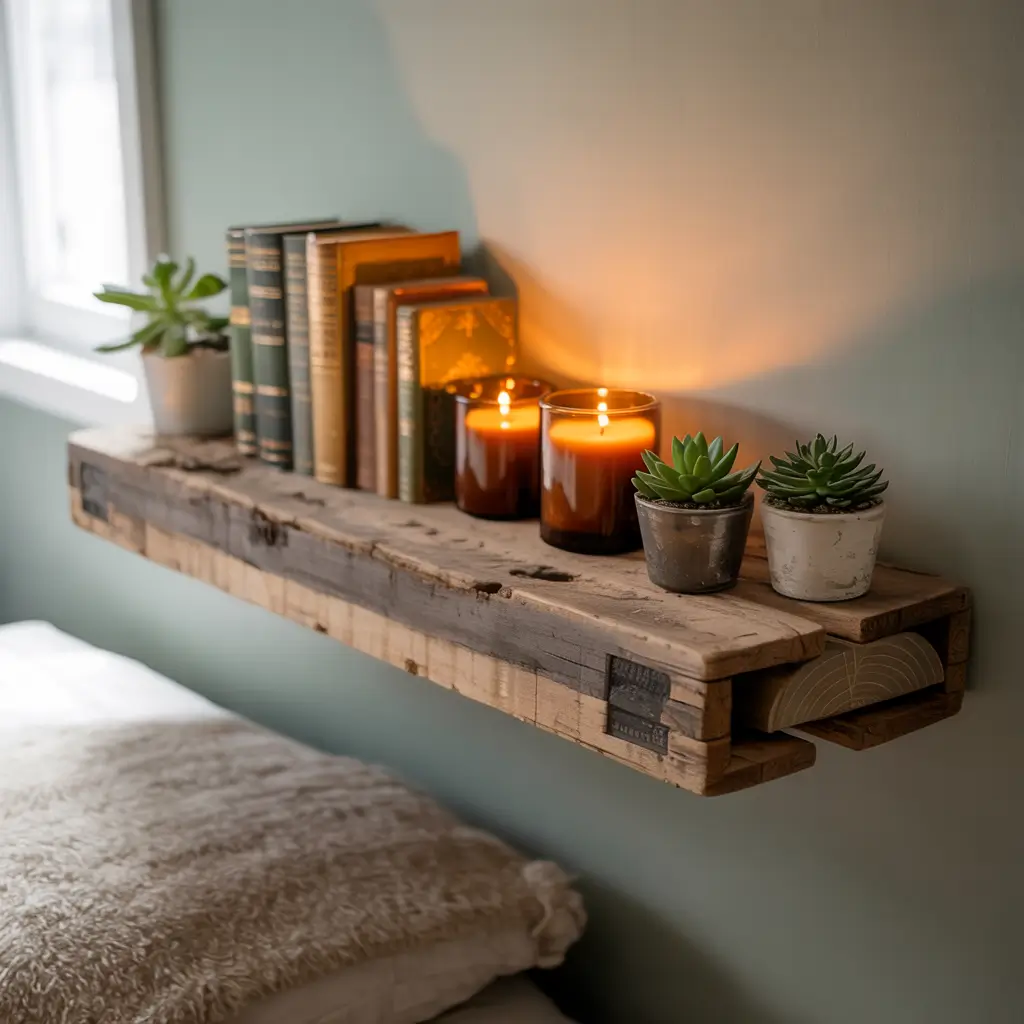
Can we talk about how wood pallet projects have taken over DIY culture? I was skeptical at first, but after building floating shelves from reclaimed pallet wood, I’m a convert.
The rustic, weathered look of pallet wood adds character that you literally cannot buy new. Each board tells a story (okay, that was cheesy, but it’s true). You can find free pallets behind many stores, just ask first and make sure they’re heat-treated (look for the “HT” stamp), not chemically treated.
Building Your Floating Shelf
What you’ll need:
- Pallet wood (disassembled and cleaned)
- Sandpaper
- Wood stain or leave it natural
- Floating shelf brackets
- Screws and wall anchors
- Level (unless you like the quirky slanted look)
I built three shelves of varying lengths and staggered them above my desk area. They hold plants, books, and all those random decorative objects that would otherwise clutter my dresser. The whole project cost me about $20 in brackets and hardware since the wood was free.
Quick warning: Pallet wood can be rough. I got more splinters during this project than in my entire childhood. Wear gloves, sand thoroughly, and maybe keep tweezers handy. You’re welcome.
Also Read: 15 Creative Boys Bedroom Decor and Unique Theme Picks
Minimalist Washi Tape Wall Mural
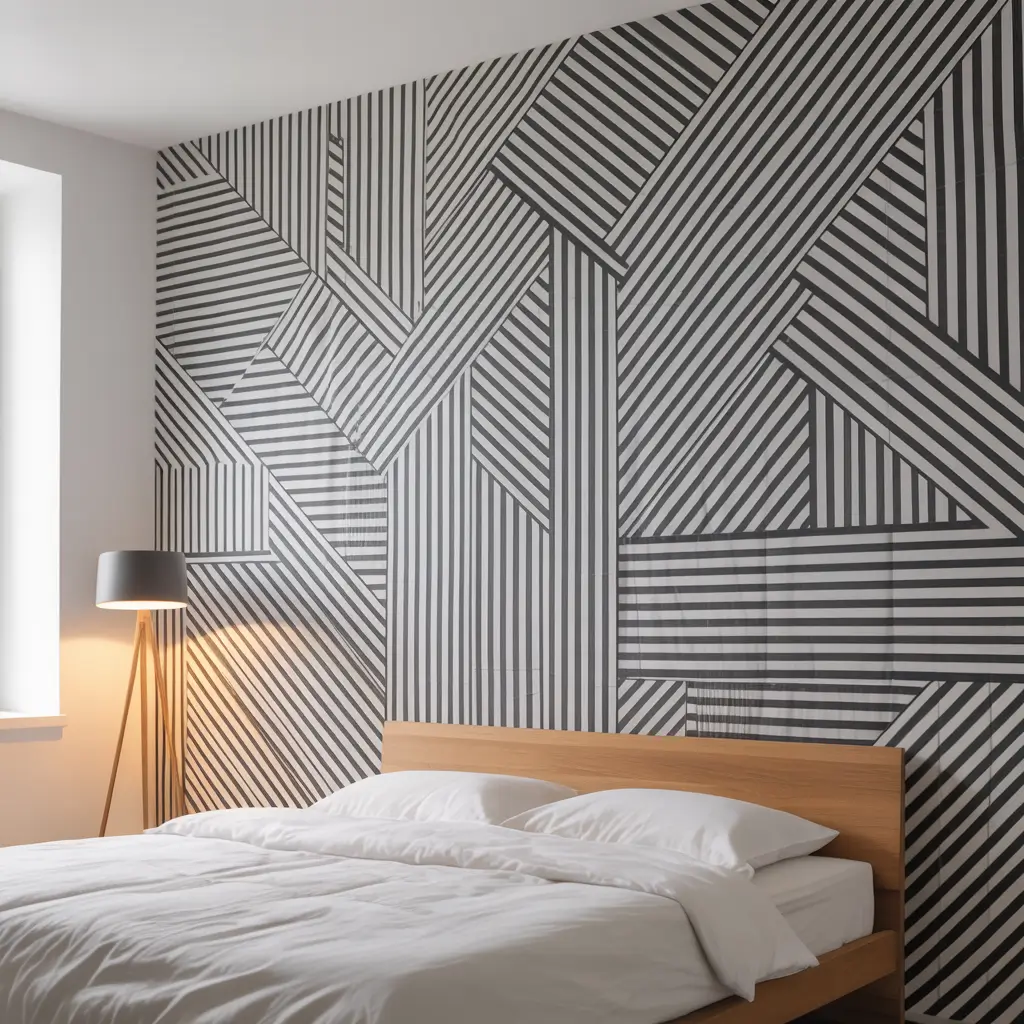
If commitment issues were a decor choice, washi tape wall art would be it. This is perfect for renters or anyone who changes their mind about design more often than their sheets.
Washi tape comes in approximately 47 million patterns and colors (okay, maybe I’m exaggerating, but barely). I created a geometric mountain range design above my bed using three shades of blue tape, and the whole thing took maybe an hour.
The best part? Washi tape removes cleanly without damaging paint. Made a mistake? Peel it off and try again. Want to change your design seasonally? Go for it. Want to create:
- Geometric patterns
- Faux headboards
- Abstract art
- Grid patterns for photo displays
- Inspirational quotes
All of these work beautifully. I’ve seen people create incredibly intricate designs, but honestly, simple and clean looks just as good. My mountain mural uses maybe $15 worth of tape, and I still get compliments on it months later.
Boho Dried Flower Wall Hanging
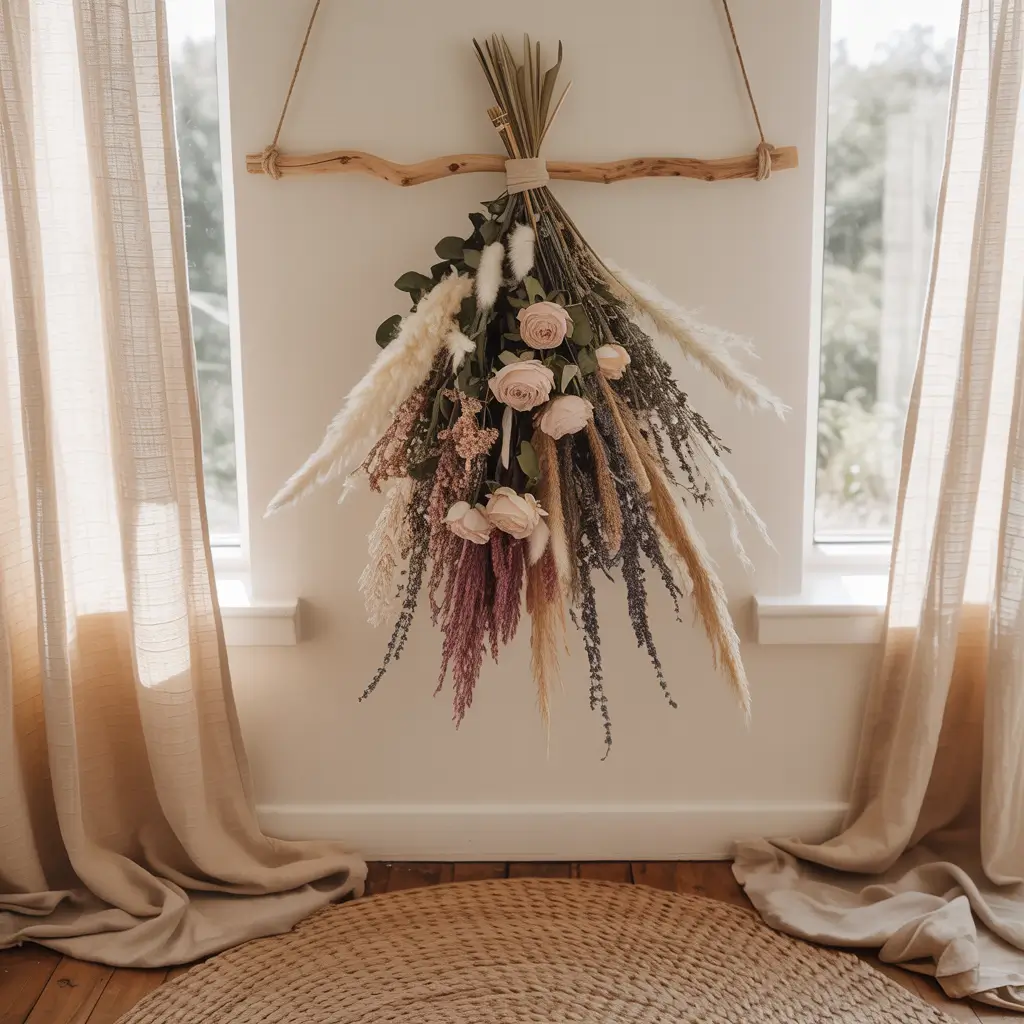
Fresh flowers die. It’s tragic but true. Dried flowers, however, last basically forever and look effortlessly cool hanging on your wall.
I started collecting flowers to dry after realizing I was spending way too much on bouquets that lasted a week. Now I dry everything: roses, eucalyptus, lavender, pampas grass, baby’s breath—you name it.
Creating a wall hanging is ridiculously simple:
- Gather your dried flowers (you can buy them or dry your own)
- Arrange them how you like
- Secure with twine or thin wire
- Hang from a small branch, dowel, or decorative hook
The boho aesthetic this creates is chef’s kiss. My wall hanging hangs above my dresser, and the neutral tones work with literally any color scheme I experiment with. Plus, certain dried flowers like lavender and eucalyptus add a subtle, natural scent to your room.
One heads up: Keep them out of direct sunlight, or they’ll fade faster than your motivation on a Monday morning. FYI, some flowers dry better than others—roses and lavender are beginner-friendly, while something like tulips might disappoint you.
Upcycled Vintage Frame Gallery
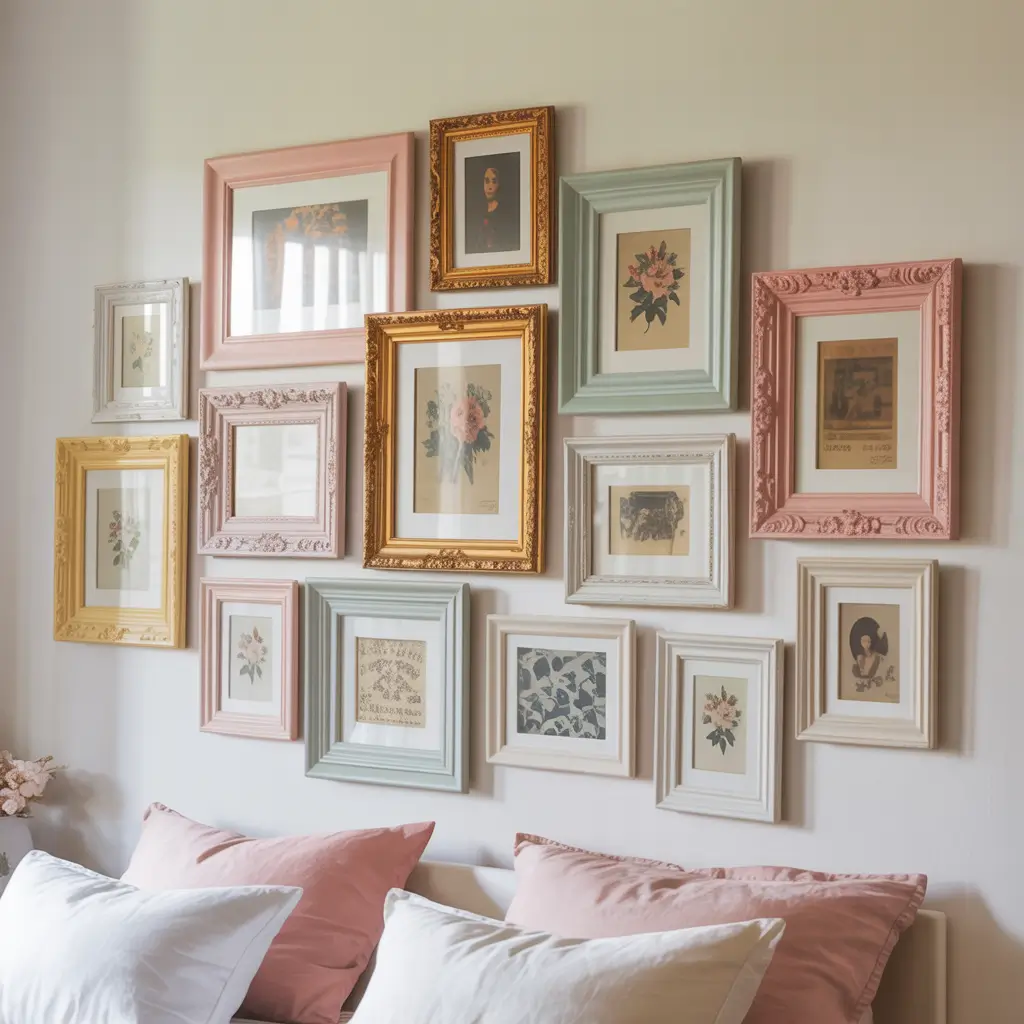
I have a mild obsession with thrift store picture frames. They’re usually under $5, and each one has its own character that new frames just don’t have. Creating an upcycled vintage frame gallery wall became my weekend project that spiraled into a full-blown hobby.
Making Your Frames Pop
You don’t need to keep frames in their original state. I’ve:
- Spray painted ornate gold frames matte black
- Left some with their vintage patina
- Mixed different metallic finishes
- Combined wood and metal frames
The key to a gallery wall that doesn’t look chaotic? Pick a unifying element. Mine is that all frames are either black, brass, or natural wood. The contents vary—art prints, pressed flowers, vintage postcards, even fabric swatches—but the frame consistency ties it together.
I arranged everything on my floor first (seriously, do this step—saves so many wall holes). Take a photo of your layout, then recreate it on the wall using a level and some patience. My 20-frame gallery wall took an afternoon to hang but transformed my entire bedroom vibe.
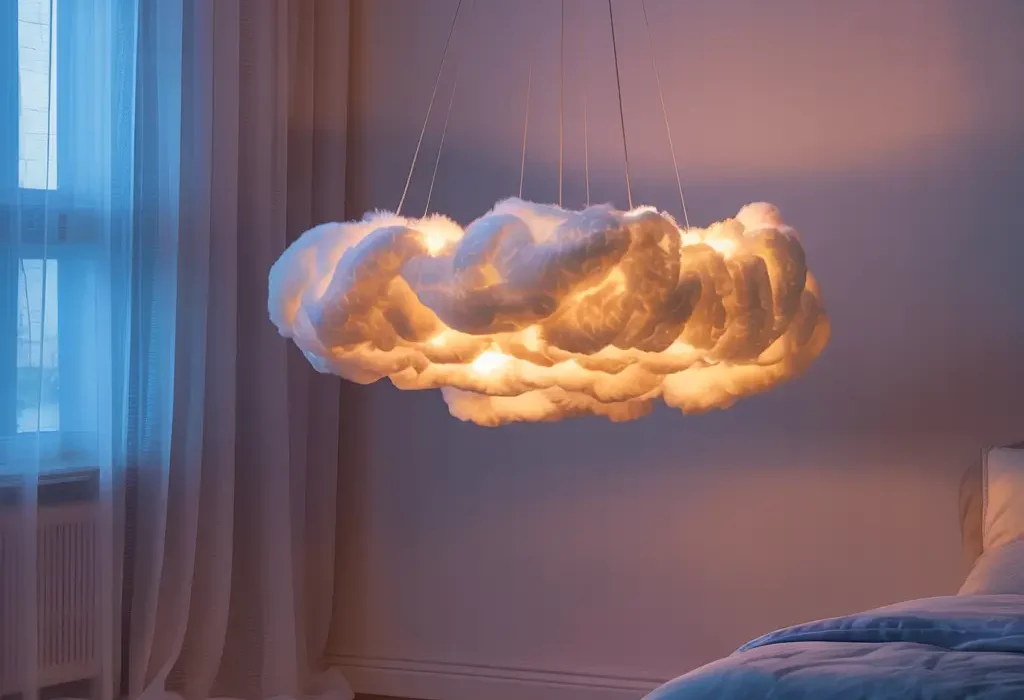
DIY Cloud-Inspired Pendant Light
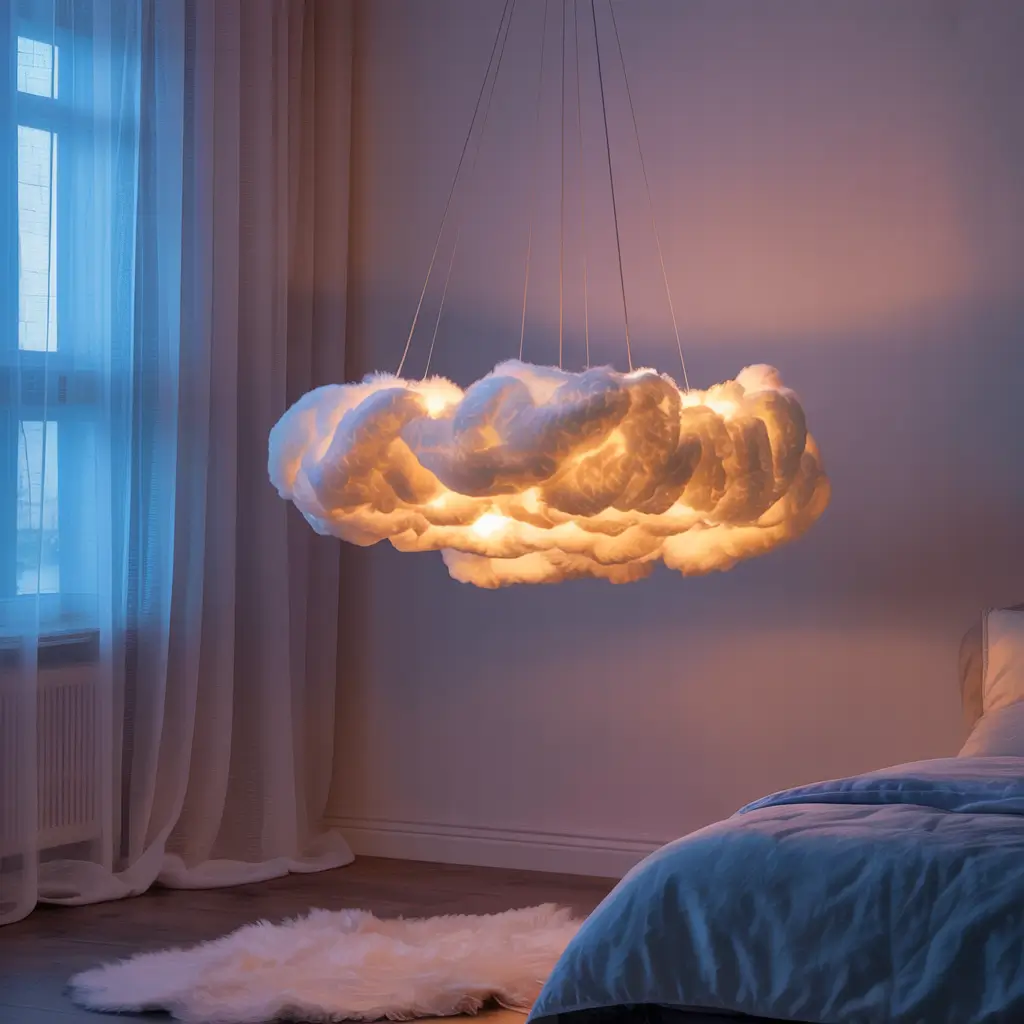
Okay, this one might sound ambitious, but hear me out. Cloud pendant lights create the dreamiest ambiance, and making one is way easier than you’d think.
I used a basic paper lantern (the cheap kind you get for like $3) as my base and transformed it with:
- Poly-fil stuffing (the stuff you’d use for pillows)
- Hot glue gun
- String lights or an LED bulb
You basically attach clouds of stuffing to the lantern exterior using hot glue. The light shining through creates this soft, diffused glow that’s perfect for a bedroom. It’s whimsical without being childish—more ethereal and calming than cutesy.
The whole project cost me under $15 and took about two hours while watching TV. Now my room has this cozy, dreamy lighting that I actually look forward to coming home to. Who knew cloud-gazing could happen from your bed? 🙂
Personalized Name Neon Sign (DIY LED)
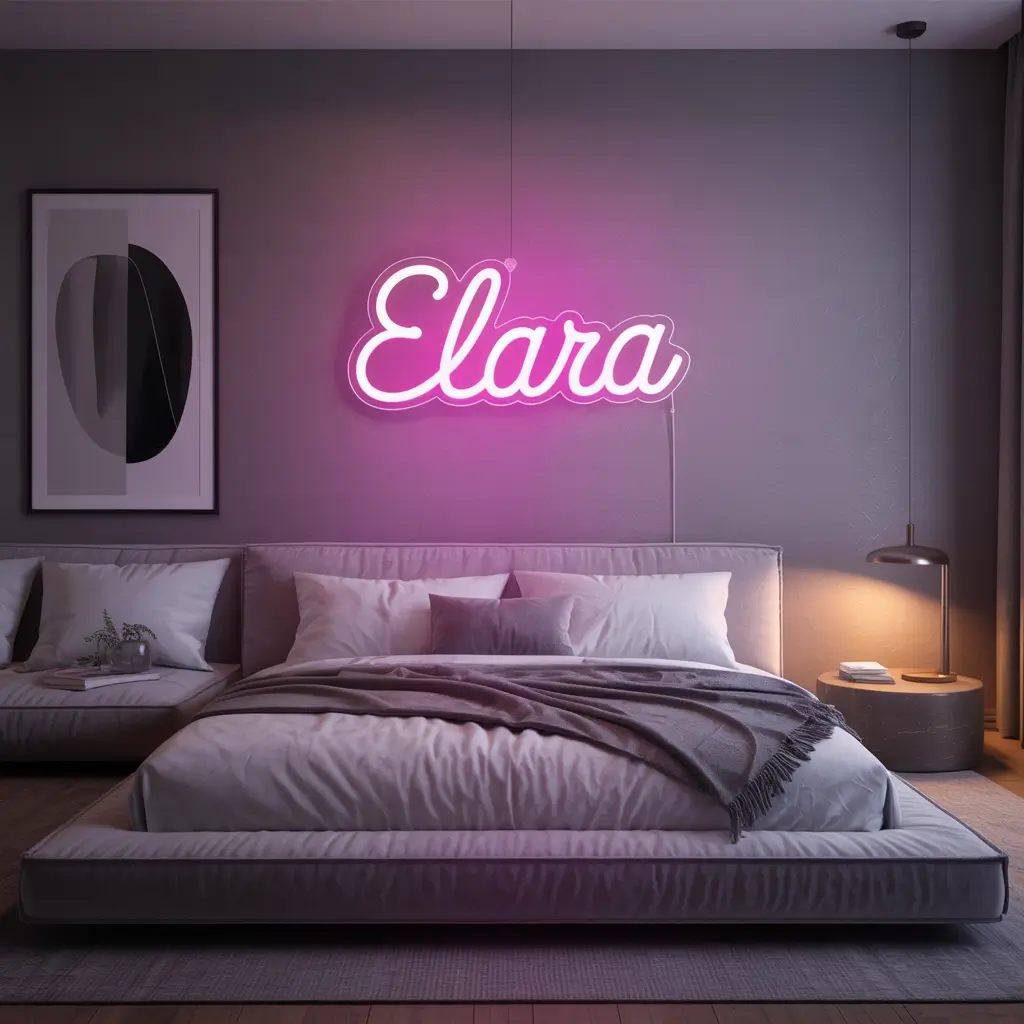
Real neon signs cost approximately one kidney. Luckily, DIY LED neon-style signs exist, and they look nearly identical at a fraction of the cost.
I created mine using LED neon rope lights, which are flexible, come in tons of colors, and don’t require any electrical expertise. You’ll need:
Essential supplies:
- LED neon rope light in your chosen color
- Clear acrylic sheet or wood backing
- Small cable clips or clear mounting putty
- Design template (print your word/name)
You trace your design onto the backing, secure the LED rope following your pattern using clips, and plug it in. That’s it. My name glows above my desk in pink LED light, and everyone assumes I spent $200+ on it. Nope. $35 and a Sunday afternoon.
The ambiance this creates is unmatched. It’s functional lighting with major style points. Plus, LED lights don’t get hot like traditional neon, so you’re not creating a fire hazard.
Also Read: 15 Cozy Cherry Wood Bedroom Decor Ideas for Relaxing Vibes
Textured Plaster Accent Canvas
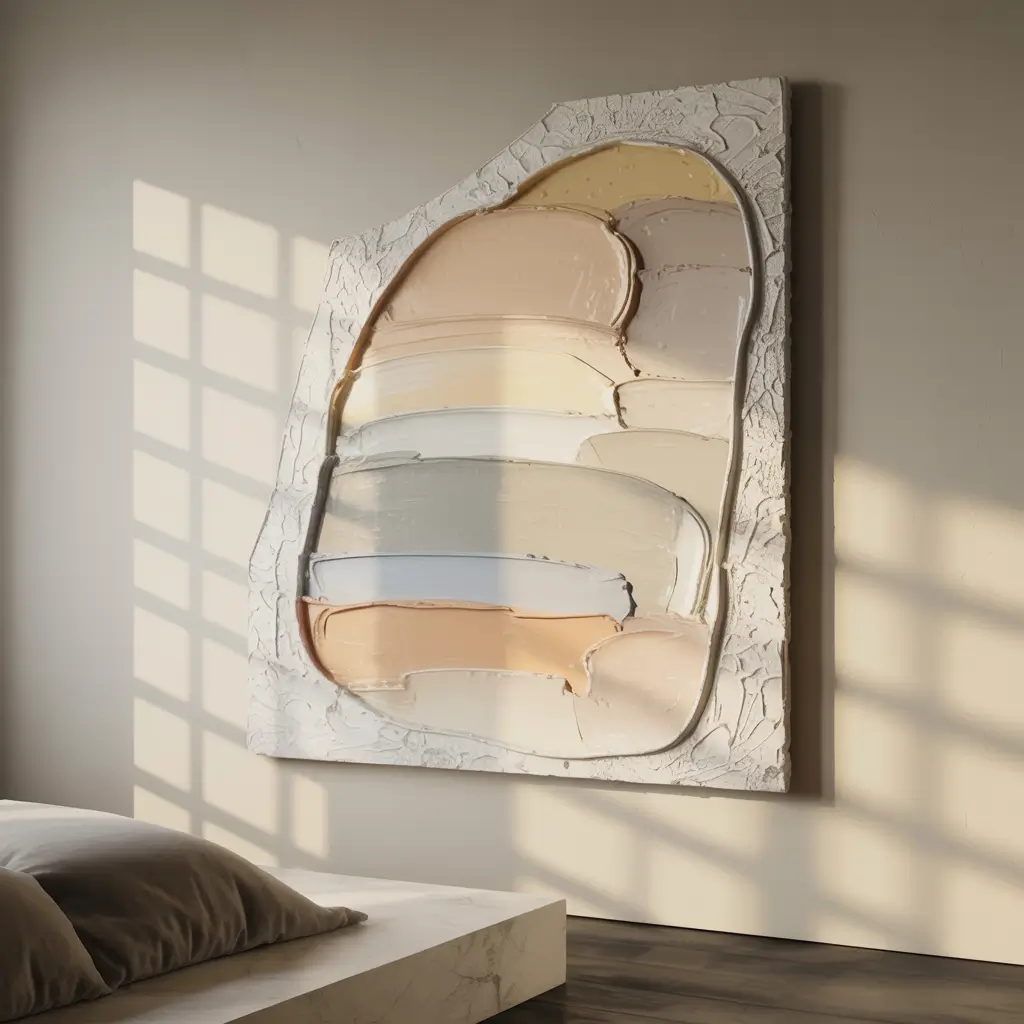
Abstract art is subjective, which means you literally cannot mess this up. Textured plaster canvases look expensive and sophisticated, but they require zero artistic ability.
I bought a large canvas from a craft store during a sale ($12), grabbed some joint compound from the hardware store ($8), and went to town. You apply the plaster with:
- A palette knife
- Old credit cards
- Textured sponges
- Even crumpled plastic bags
Create whatever texture and movement speaks to you. I did sweeping, organic curves in white plaster, let it dry for 24 hours, and now it’s the centerpiece above my bed. Some people add paint washes over the plaster for subtle color—I kept mine pure white for that minimalist vibe.
The dimensional texture catches light differently throughout the day, so it’s like having art that changes moods. For under $25, you’re getting a custom piece that fits your space perfectly.
DIY Rope-Wrapped Mirror Frame
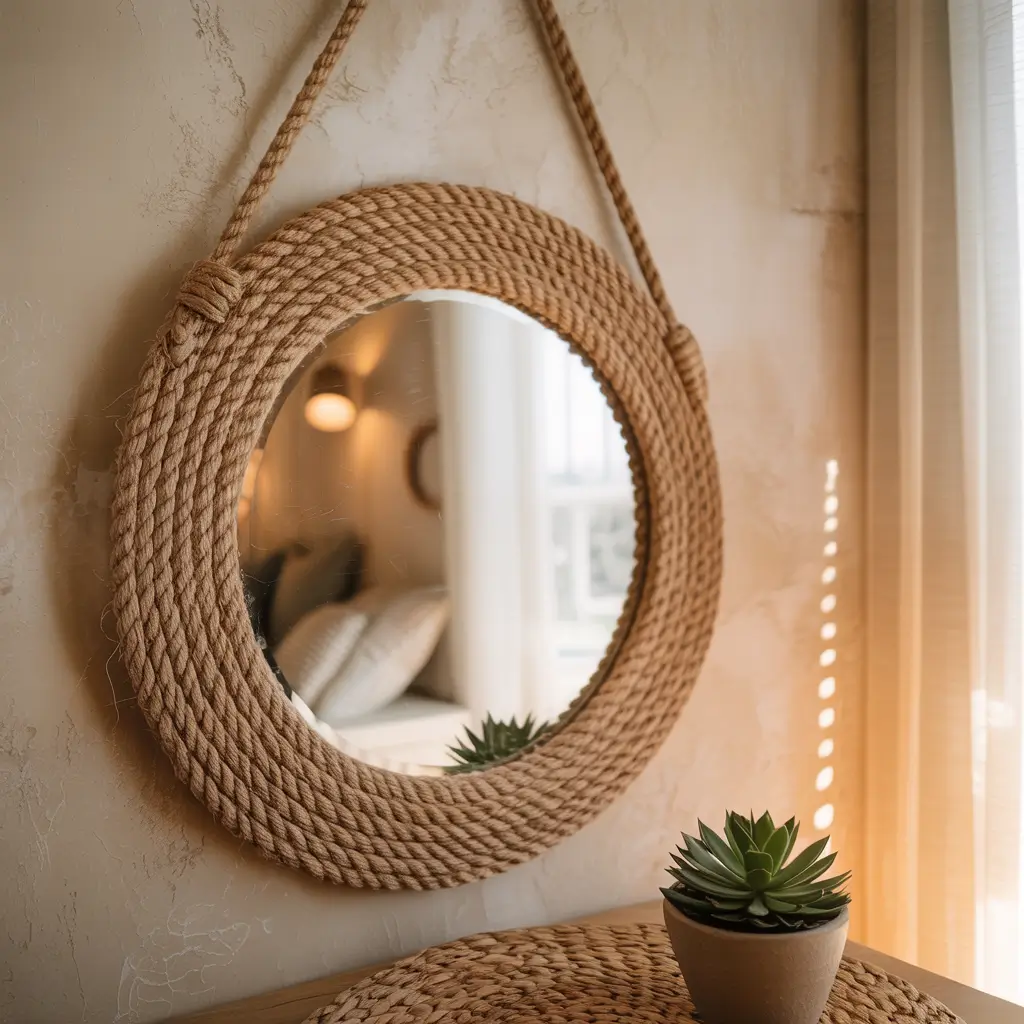
Basic mirrors are fine. Rope-wrapped mirrors? They’re a vibe. This nautical-inspired DIY works in way more design styles than you’d expect—boho, coastal, minimalist, even modern farmhouse.
I found a plain round mirror at Target for $15 and transformed it with $10 worth of sisal rope and a hot glue gun. The process is meditative: you just wrap rope around the frame edge, gluing as you go, until the entire frame disappears under rope texture.
Why This Works
The rope adds:
- Warmth through natural texture
- Dimension that flat frames lack
- Visual interest without overwhelming color
My rope-wrapped mirror hangs above my dresser and somehow makes my getting-ready area feel like a boutique hotel. The natural rope color is neutral enough to work with any color scheme changes I make.
Pro tip: Use a high-temperature hot glue gun for better adhesion. My first attempt with a low-temp gun resulted in rope slipping off after a week. Learn from my mistakes, people.
Patterned Stencil Accent Wall
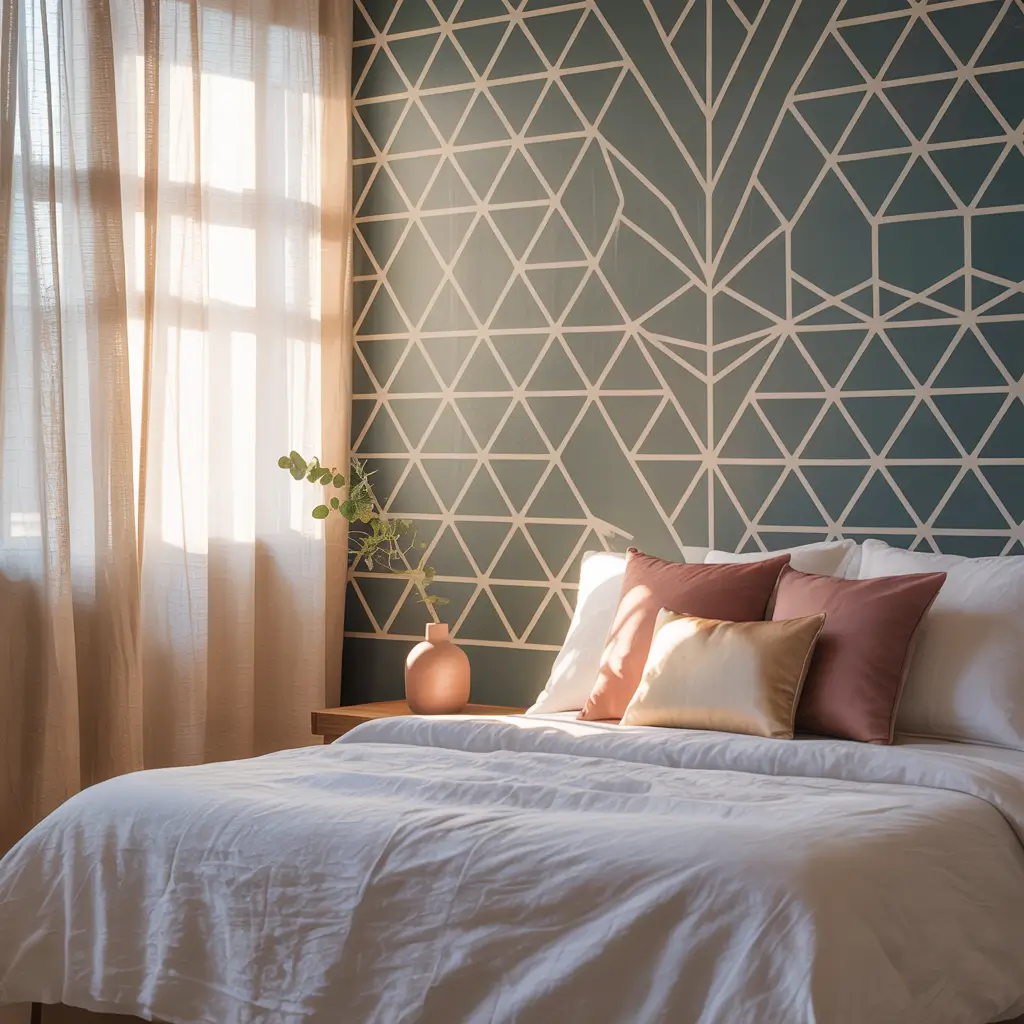
Painting an entire room is commitment. A stenciled accent wall? That’s the perfect middle ground between boring solid walls and full-room color commitment.
I was terrified of this project at first. What if I messed up the pattern? What if it looked crooked? Turns out, slight imperfections actually add character and prove it’s handmade. I chose a Moroccan-inspired stencil pattern and painted it on the wall behind my bed in a contrasting color to my wall paint.
You’ll need:
- A reusable stencil in your chosen pattern
- Paint in your accent color
- Foam roller (works better than brushes)
- Painter’s tape
- Level and pencil for guidelines
- Patience (this takes longer than you think)
The key is using very little paint on your roller—less is more to prevent bleeding under the stencil. I did my wall over two evenings, and yeah, my arm was sore from holding the stencil in place, but the result is stunning.
This accent wall cost me about $40 total and looks like I hired a professional muralist. Every time someone sees it, they ask who I hired. The satisfaction of saying “I did it myself” never gets old.
Handmade Crochet Throw Pillows
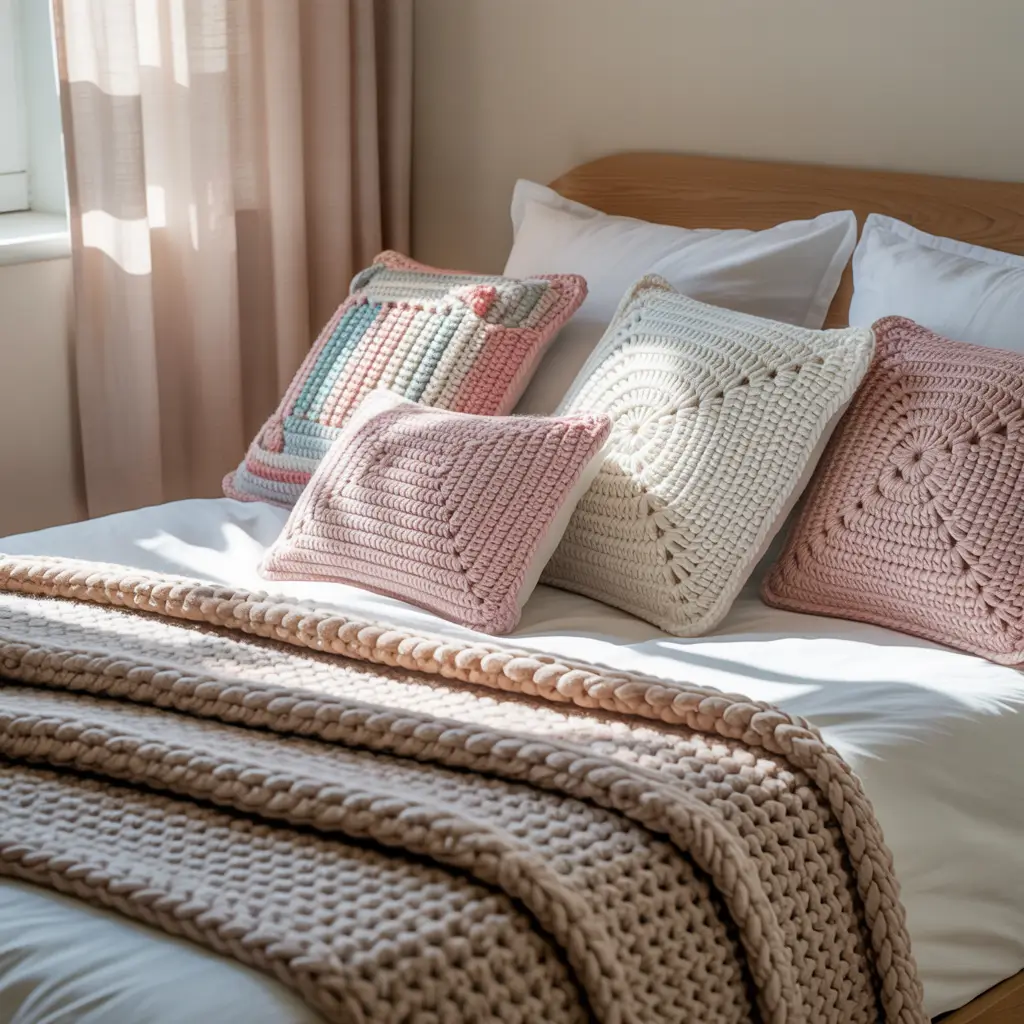
If you can crochet a simple granny square, you can make custom throw pillows that actually match your bedroom aesthetic. I learned to crochet specifically for this project, and honestly, it’s not as hard as it looks.
YouTube became my teacher (shoutout to all the crochet tutorial creators), and within a weekend, I’d made my first slightly wonky pillow cover. Three months later, I have five pillows in various textures and patterns adorning my bed.
Why Crochet Your Pillows?
- Custom colors that actually match your room
- Texture variety from different stitch patterns
- Size control—make them exactly as big or small as you want
- Meditative process that’s actually relaxing
I use chunky yarn for faster projects and visual impact. A basic 16×16 pillow cover takes me about 4-5 hours now, though my first one took approximately 47 hours (I’m exaggerating, but it felt that long). You can buy pillow inserts cheaply online—I got mine for $3 each.
The handmade quality adds coziness that store-bought pillows can’t replicate. Plus, people are always impressed by handmade items, even if your stitches aren’t perfectly uniform.
DIY Wooden Bedside Organizer
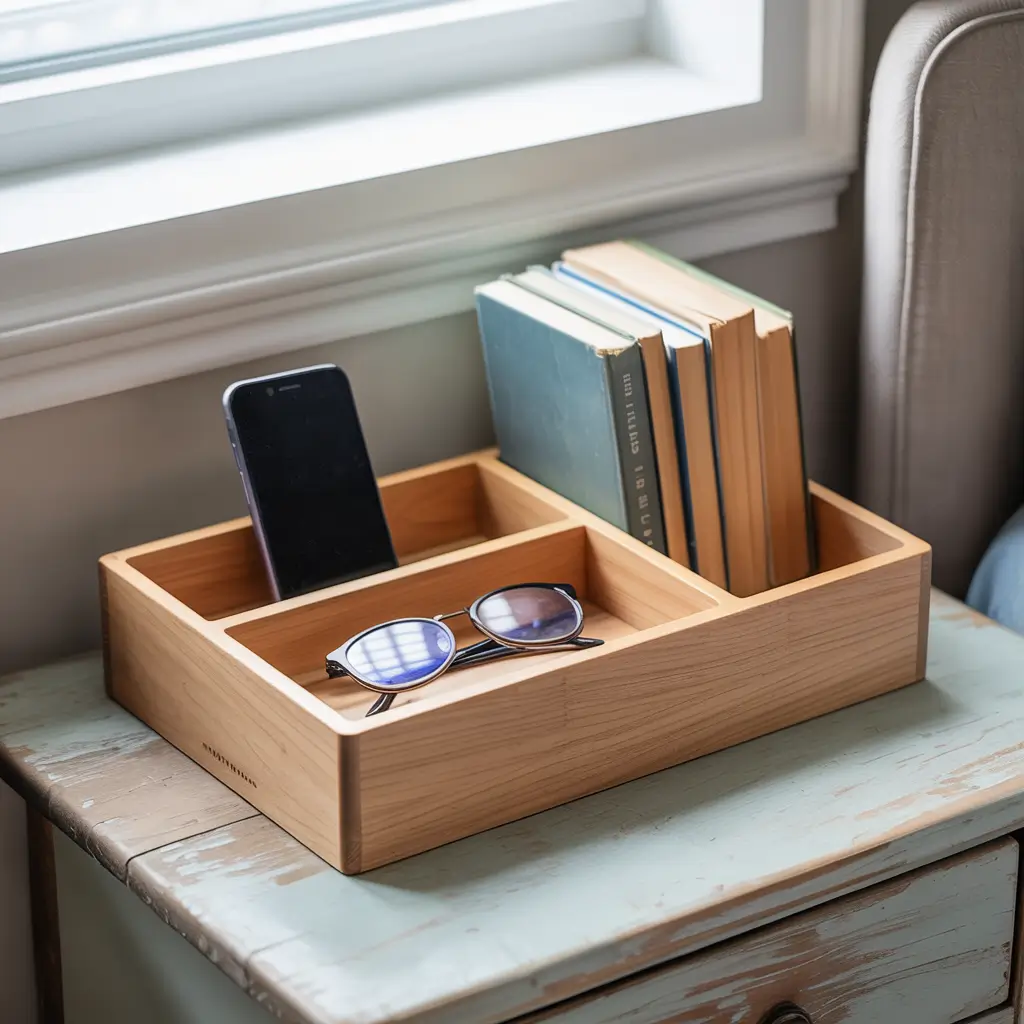
Nightstand clutter is real. Books pile up, phone chargers tangle, water glasses multiply—it’s chaos. A wooden bedside organizer solved this mess in my life.
I built mine from a single pine board from the hardware store (cost: $8), which I cut into sections using a handsaw (or you can have the store cut it for you). The design is basically a wooden box with dividers creating compartments for:
- Phone charging station
- Book/journal holder
- Small items like jewelry or lip balm
- Remote controls
No fancy woodworking skills required. I used wood glue and small finishing nails to assemble everything, sanded it smooth, and added a coat of stain. The whole project took maybe 3 hours, including drying time.
Now everything has a designated spot, which means I’m not frantically searching for my phone charger at 2 AM. Small organization wins like this genuinely improve daily life. Functional DIY projects are the best kind because you use them constantly.
Aesthetic Photo Grid With Fairy Lights
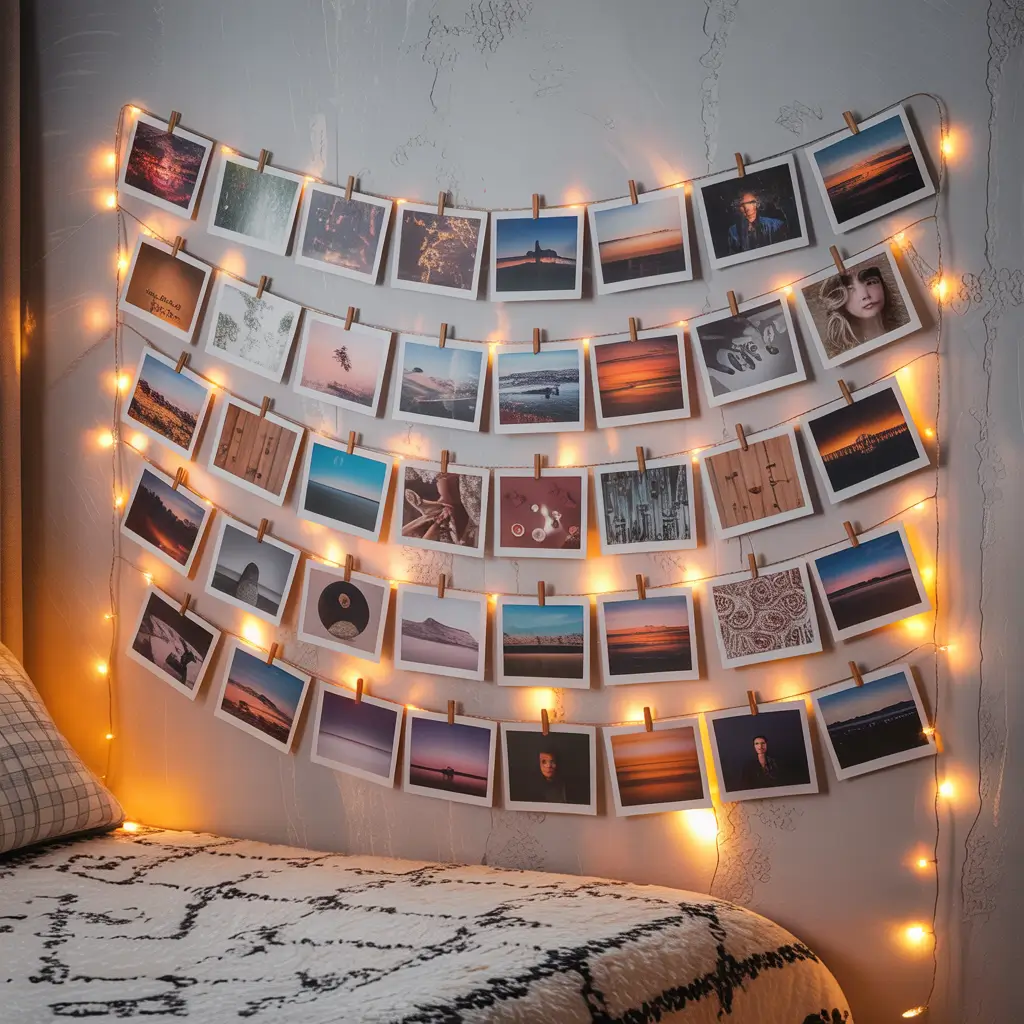
Let’s end with probably the easiest project on this list: an aesthetic photo grid with fairy lights. This is peak Instagram-worthy bedroom decor that requires minimal skill and maximum impact.
I printed favorite photos (mix of personal pics, aesthetic shots I’d saved, and some inspirational quotes) and arranged them in a grid pattern on my wall using:
- Small clothespins or photo clips
- String or twine
- Small nails or command hooks
- Battery-operated fairy lights
You string your lines horizontally or vertically across your wall space, clip photos to the strings, and weave fairy lights throughout. The warm glow of the lights creates the coziest ambiance for evening wind-down time.
What I love most about this project is how easily you can swap photos. Seasonal changes? New memories? Different mood? Just switch out the photos. It’s like having rotating art that stays personal and meaningful.
The entire setup cost me less than $25 (including photo printing), and I set it up in under an hour. Sometimes the simplest projects create the biggest impact.
Bringing It All Together
Look, you don’t need to tackle all 15 of these projects immediately (though if you do, send me photos because that’s impressive). Start with one that genuinely excites you. Maybe it’s the project that uses materials you already have, or perhaps one that solves a specific problem in your space.
I’ve done every single one of these DIYs at different points, and each transformed my bedroom in its own way. Some projects took hours, others took weekends. Some cost under $10, others closer to $50. But all of them made my space feel more mine—more personal, more intentional, and way more stylish than any pre-made decor could achieve.
The beauty of DIY bedroom decor is the imperfection. That slightly crooked stencil line, the unique texture of your plaster art, the color variations in your hand-crocheted pillows—these “flaws” are actually what make your space authentic. You’re creating a bedroom that tells your story, showcases your creativity, and didn’t require you to take out a small loan.
So grab some supplies, put on a good playlist or podcast, and start creating. Your bedroom (and your wallet) will thank you. And when people inevitably ask where you got that amazing [insert whichever project you choose], you get to casually drop the “Oh, I made it” bomb. That feeling never gets old, trust me.